Apache Tutorial
Set up a Ubuntu/Apache cloud-based server
Install phpMyAdmin
_______________________________________________
Preparations
phpMyAdmin is a free software tool written in php, intended to handle the administration of MySQL over the Web. phpMyAdmin supports a wide range of operations on MySQL and MariaDB, a database extremely similar to MySQL. Frequently used operations like managing databases, tables, columns, relations, indexes, users, permissions, etc., can be performed via the user interface online. You have the ability to directly execute any SQL statement in phpMyAdmin.
You can learn more about phpMyAdmin here.
Make sure:
- The PowerShell window is open.
- The server text file you made is open.
- The Nightly browser is minimized.
_______________________________________________
Add these lines to your server text file. Be sure to replace the IP and password where necessary.
######
ssh root@Your-IP
Your-Password
systemctl status sshd
###
###
###    INSTALL STANDARD phpMyAdmin
###
###
apt install phpmyadmin
###  Warning: When the prompt appears, 'apache2' is highlighted, but not selected.
###  Configuration will be required.
systemctl restart apache2
systemctl restart mysql
-->  to see user table:
mysql -u root -p
SELECT user,authentication_string,plugin,host FROM mysql.user;
exit
-->  harden access   https://www.tecmint.com/change-secure-phpmyadmin-login-url-page/
nano  /etc/phpmyadmin/apache.conf
###  Set new alias, change to something else:
###  was Alias /phpmyadmin /usr/share/phpmyadmin
Alias /my-phrase /usr/share/phpmyadmin
-->  save file
systemctl restart apache2
systemctl restart mysql
systemctl status apache2
systemctl status mysql
-->  Apache is already secured, so phpMyAdmin is as well.
-->  verify the following line is present or added in:
nano /etc/phpmyadmin/config.inc.php     --> or it may be instead in:
nano /etc/phpMyAdmin/config.inc.php file:
$cfg['ForceSSL'] = true;   --> add after server config
systemctl restart apache2
systemctl status apache2
-->  to test, enter url with phpadmin alias
### SNAPSHOT My-server-phpMyAdmin
--> when snapshot complete (verify with server VPS console) reboot.
reboot
_______________________________________________
Make sure you are logged into your Ubuntu server with PowerShell. You may see some upgrade info. If so we will get to it through this path:
apt updateRecently, apt update has been deprecated. This means it will work right now but will not some time in the future. I will tell you how to bypass this warning later on in the Domain Optimization section of the tutorial.
apt list --upgradableapt upgradeAs the upgrade progresses, sometimes it may stop and ask you a question. 99% of the time it will be OK to say OK. If it suggests a reboot, do it. Then start over at the apt update. The notice may look like this:
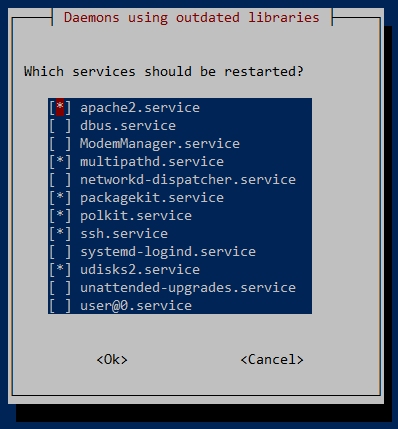
To make it start running again, use the Tab key to highlight the <Ok> key. Then press Enter. You can also use the Space Bar to change states of choice, for example, to select or deselect an option. The Tab key allows you to move around to highlight different areas in the response area. Answer the request and move to the next command.
apt dist-upgradeapt autoremove_______________________________________________
Install the phpMyAdmin module. It may ask you to restart some services. You can do this but there are usually one or more reboots during the installation. You can reboot when asked to for practice if you like.
apt install phpmyadminThe Configuring phpmyadmin box will appear with a choice of web servers. Warning: The choice of apache2 is highlighted, but not selected. You must press the spacebar on your keyboard. You should see an * (asterisk) appear before apache2. Then press Tab to move the focus to <Ok>. Then press Enter.
You will be asked if you want to configure a database for phpmyadmin. Select No. This will complete the phpMyAdmin setup.
Restart and verify the services:
systemctl restart apache2systemctl restart mysqlsystemctl status apache2systemctl status mysql_______________________________________________
A D V E R T I S E M E N T
_______________________________________________
One of the ways hackers try to get at your databases is through phpMyAdmin. The standard way to access the GUI is with the name phpmyadmin after your URL. We are going to make it harder to even find the starting page for your phpMyAdmin GUI. Enter the nano editor for the phpMyAdmin Apache2 configuration file:
nano /etc/phpmyadmin/apache.confThe default Alias for phpMyAdmin is /phpmyadmin. Make up a phrase, my-phrase that you can remember, like jumpovertherainbow. Change the Alias /phpmyadmin /usr/share/phpmyadmin to Alias /my-phrase /usr/share/phpmyadmin Save the file and do some restarts and verifications:
systemctl restart apache2systemctl restart mysqlsystemctl status apache2systemctl status mysqlBy virtue of the fact we have secured the apache2 server, phpMyAdmin is also secured. That means it cannot be accessed by an http request but must be reached via an https request. We need to reinforce this inside the phpMyAdmin configuration file. Enter:
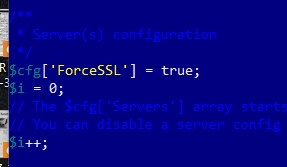
nano /etc/phpmyadmin/config.inc.phpAdd the following line at the start of the Server(s) configuration section:
$cfg['ForceSSL'] = true;The file should look like this:
Save the file Ctrl X, Y, Enter and restart the Apache2 server. Remember, q stops the listing when you do the following status commands:
systemctl restart apache2systemctl status apache2_______________________________________________
A D V E R T I S E M E N T
_______________________________________________
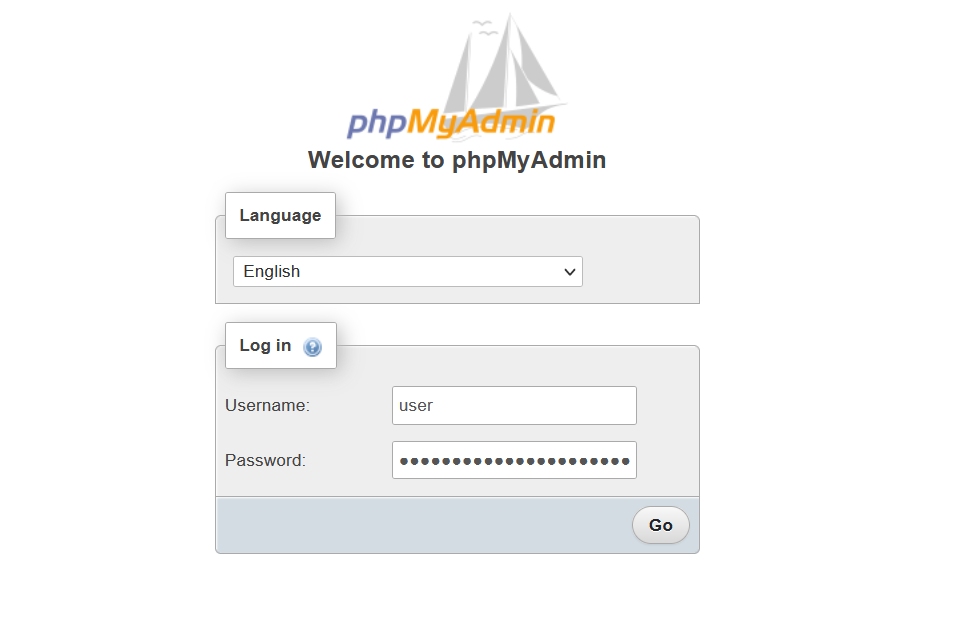
Test your phpMyAdmin. Open a new tab in Nightly. Enter your URL. Add the /my-phrase after the URL. It should look like this: Your URL/my-phrase. Press Enter. You'll see the phpMyAdmin login screen:
Enter your login credentials. You should see a similar screen:
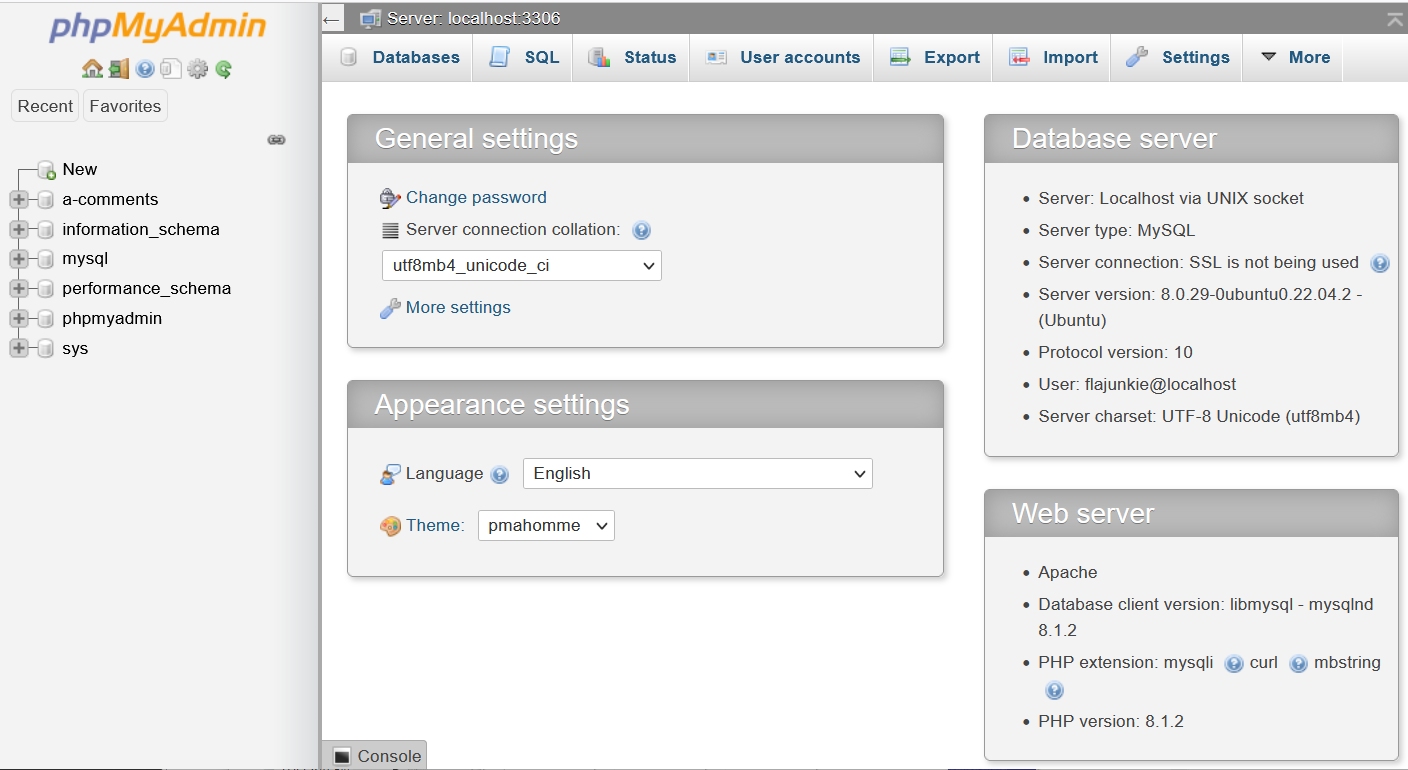
Look at the left side of the screen. You probably do not see a database named phpmyadmin. This will cause a problem, but no worries.
Scroll down to the bottom of the page. You may see the following warning: The phpMyAdmin configuration storage is not completely configured. Click on the link that says: Find out why and it will take you to a reason. This is simple, just click the Create link and a database will be created.
Look back over to the left side and you will see the new database. You can close the phpMyAdmin GUI by selecting the Log out icon under the phpMyAdmin heading.
That's a quick intro to the phpMyAdmin program. You will use it when you have databases to install and control. There will be a sample for you to experiment with later on.
The Apache2 server needs to be configured for your webpages. Take a break and shut down your tools if you are stopping here. When you are ready, proceed to Domain Optimization.
Domain Optimization_______________________________________________
COMMENTS - Install phpMyAdmin
_______________________________________________

_______________________________________________

_______________________________________________
If You Like This:
I may make affiliate fees from services you select on this website.
Thank you!
©1998-2023 RocketRanch