Apache Tutorial
Set up a Ubuntu/Apache cloud-based server
Install Your Domain
_______________________________________________
Introductory Comments
It's time to do the initial domain work on your Apache2 web server. When we are finished, you will have a place to put your domain files. This will allow Apache to access them and serve them on request to the Internet. You can host many different websites with this single Apache2 server!
_______________________________________________
Preparations
Make sure:
- The PowerShell window is open.
- The server text file you made is open.
- The Nightly browser is minimized.
- FileZilla is opened.
_______________________________________________
Update your working server text file
Add these lines to your server text file. Be sure to replace the IP and password where necessary. Also, replace the your-domain.com with Your-Domain. The .com extension is to remind you that it is a part of the domain name.
######
ssh root@Your-IP
Your-Password
systemctl status sshd
######
###
###
###  Install domain   your-domain.com
###
###
-->  verify/configure DNS settings
mkdir -p /var/www/your-domain.com
chown -R www-data:www-data /var/www/www.fbodyfirst7.com/
nano /etc/apache2/sites-available/www.your-domain.com.conf
<VirtualHost  *:80>
    ServerName your-domain.com
    ServerAlias your-domain.com
    ServerAdmin admin@your-domain.com
    DocumentRoot /var/www/your-domain.com
    ErrorLog ${APACHE_LOG_DIR}/error.log
    CustomLog ${APACHE_LOG_DIR}/access.log combined
    RewriteEngine On
    RewriteCond %{HTTPS} off
    RewriteRule ^(.*)$ https://%{HTTP_HOST}%{REQUEST_URI} [L,R=301]
</VirtualHost>
a2ensite your-domain.com
nano /etc/cloud/templates/hosts.debian.tmpl
Your-IP your-domain.com
-->  save file
systemctl restart apache2
systemctl status apache2
nano /etc/apache2/sites-available/www.Your-Domain-le-ssl.conf
<IfModule mod_ssl.c>
  <VirtualHost  *:443>
    ServerName  example.com
    ServerAlias  www.example.com
    ServerAdmin admin@www.example.com
    DocumentRoot /var/www/www.example.com
    ErrorLog ${APACHE_LOG_DIR}/error.log
    CustomLog ${APACHE_LOG_DIR}/access.log combined
    # Redirect NON-WWW HTTP to WWW HTTPS
    RewriteEngine On
    RewriteCond %{HTTP_HOST} !^www\. [NC]
    RewriteRule ^(.*)$ https://www.%{HTTP_HOST}%{REQUEST_URI} [R=301,L]
  </VirtualHost>
</IfModule>
-->  save file
systemctl restart apache2
systemctl status apache2
_______________________________________________
Update your Ubuntu server files
Make sure you are logged into your Ubuntu server with PowerShell. You may see some upgrade info. If so we will get to it through this path:
apt updateRecently, apt update has been deprecated. This means it will work right now but will not some time in the future. I will tell you how to bypass this warning later on in the Domain Optimization section of the tutorial.
apt list --upgradableapt upgradeIf the upgrade asks you a question, 99% of the time it will be OK to say OK. It may look like this:
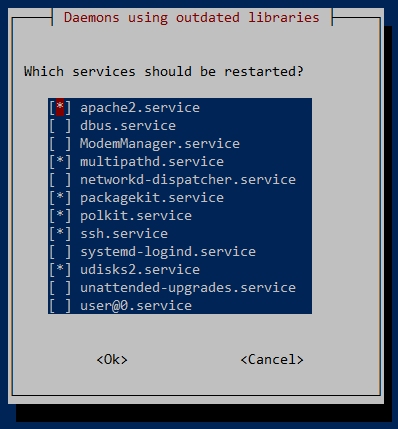
To make it start running again, use the Tab key to highlight the <Ok> key. Then press Enter. You can also use the Space Bar to change states of choice, for example, to select or deselect an option. The Tab key allows you to move around to highlight different areas in the response area. Answer the request and move to the next command.
apt dist-upgradeapt autoremove_______________________________________________
A D V E R T I S E M E N T
_______________________________________________
DNS Configuration
Make sure you have the DNS set up properly. If you are following this tutorial, you would have accomplished this during the Apache installation. We used Namecheap for this function. If you are adding a new domain, repeat the DNS configuration described in the Apache installation instructions.
_______________________________________________
Start the domain work
Enter the following command. Remember to replace your-domain.com with Your-Domain. Again, the .com extension is to remind you that it is a part of the domain name.
mkdir -p /var/www/www.your-domain.comVerify it was created by using FileZilla to examine the www directory. You should see it there.
We need to change some ownership details. The Apache2 web server user www-data is the default file operator. The web server system process is able to access files in the www-data group. Change the ownership of the new directory with the following command:
chown -R www-data:www-data /var/www/www.your-domain.com/We now need to tell Apache some things about your unsecured domain. Enter the following command to open an empty nano editor file:
nano /etc/apache2/sites-available/your-domain.com.confThe term Virtual Host refers to the practice of running more than one web site (such as company1.example.com and company2.example.com) on a single machine. Virtual Hosts can be "IP-based", meaning that you have a different IP address for every web site, or "name-based", meaning that you have multiple names running on each IP address. The fact that they are running on the same physical server is not apparent to the end user. <VirtualHost> and </VirtualHost> are used to enclose a group of directives that will apply only to a particular Virtual Host. Each Virtual Host must correspond to a different IP address, different port number, or a different host name for the server. Learn more here.
We also need to redirect non-SSL links to secure links. The Rewrite rules accomplish this. You will note they are hashed - # or REM'd (remarked) out. We will enable them later.
Enter the following text in the new file:
<VirtualHost  *:80>
    ServerName your-domain.com
    ServerAlias your-domain.com
    ServerAdmin admin@your-domain.com
    DocumentRoot /var/www/your-domain.com
    ErrorLog ${APACHE_LOG_DIR}/error.log
    CustomLog ${APACHE_LOG_DIR}/access.log combined
    RewriteEngine On
    RewriteCond %{HTTPS} off
    RewriteRule ^(.*)$ https://%{HTTP_HOST}%{REQUEST_URI} [L,R=301]
</VirtualHost>
Save the file Ctrl X, Y, Enter and enable the website in Apache2:
a2ensite your-domain.comYou must add Your-Domain name with the associated IP, Your-IP, to your Apache2 hosts file. There is a bit of a quirk in that you must edit the cloud hosts file to make the changes stick.
nano /etc/cloud/templates/hosts.debian.tmplPlace this line under the 127.0.0.1 localhost line:
Your-IP Your-Domain.comWhile you are in the hosts file, remark out the bottom three lines. They are IP6 controls. We aren't using them.
#::1 localhost ip6-localhost ip6-loopback
#ff02::1 ip6-allnodes
#ff02::2 ip6-allrouters
Save the file Ctrl X, Y, Enter and restart the Apache2 server:
systemctl restart apache2Verify it is operating in the green:
systemctl status apache2You can test if your URL or Your-Domain is on the Internet by typing them into Nightly. If the DNS is set up properly, you will see a Forbidden notice. This is because there are no website files in the directory. Earlier, we instituted a directive to not allow indexing of the directories.
_______________________________________________
A D V E R T I S E M E N T
_______________________________________________
We've completed half of the domain work. The last part is getting ready for our secure SSL webpage. We require an Apache2 configuration file and a certificate for SSL to work. When we are done, the Apache2 server will be properly configured to accept an SSL certificate. The server can then display a locked SSL symbol indicating the site is secure.
Create the SSL file for your domain. Remember, Your-Domain includes the Top Level Domain or TLD. If your domain is example.com, the .com part is the TLD. If your domain is example.net, the .net part is the TLD.
nano /etc/apache2/sites-available/www.Your-Domain-le-ssl.confThe example.com domain would look like this: ../www.example.com-le-ssl.conf
Our server will operate at the www level, not a naked domain. This means our referred URL will include www, for example, www.example.com. If someone types example.com, the naked domain name, we will redirect the request to the www subdomain. This is somewhat complex for right now but you can learn more here.
We also want to force our users to the SSL page with the lock. To do these things we need to add some redirection code.
Paste these lines of code into the file. Remember to replace example.com:
<IfModule mod_ssl.c>
  <VirtualHost  *:443>
    ServerName  example.com
    ServerAlias  www.example.com
    ServerAdmin admin@www.example.com
    DocumentRoot /var/www/www.example.com
    ErrorLog ${APACHE_LOG_DIR}/error.log
    CustomLog ${APACHE_LOG_DIR}/access.log combined
    # Redirect NON-WWW HTTP to WWW HTTPS
    RewriteEngine On
    RewriteCond %{HTTP_HOST} !^www\. [NC]
    RewriteRule ^(.*)$ https://www.%{HTTP_HOST}%{REQUEST_URI} [R=301,L]
  </VirtualHost>
</IfModule>
Save the file Ctrl X, Y, Enter and restart the Apache2 server:
systemctl restart apache2Verify it is operating in the green:
systemctl status apache2_______________________________________________
A D V E R T I S E M E N T
_______________________________________________
Now it's time to install Certbot. Reboot the server and press on when you are ready.
Install Certbot_______________________________________________
COMMENTS - Set up your domain
_______________________________________________

_______________________________________________

_______________________________________________
If You Like This:
I may make affiliate fees from services you select on this website.
Thank you!
©1998-2023 RocketRanch