Apache Tutorial
Set up a Ubuntu/Apache cloud-based server
Initial Ubuntu Server Configuration
_______________________________________________
Preparations
- Open your server text file.
- Open the PowerShell.
- Open the Nightly browser. Log in to your server account. Select your server. Minimize the browser.
There may be some repeats ahead that give you a feeling of déjà vu. It isn't your imagination. It will be some reinforcement of ideas.
_______________________________________________
Time to use PowerShell
Go to the server text file and copy the line ssh root@Your-IP.
Click one time anywhere inside the PowerShell window. It should become the focus. Keep your cursor over the window and simply right-click. Voila! The line you copied is now in PowerShell after the PS C:\WINDOWS\system32>. Press Enter on your keyboard. You will see a line with root@Your-IP's password:.
If you delay too long, you may see a Connection closed... message. No worries, just press the UP ARROW key on your keyboard and the original line you pasted will be there! Press Enter again.
The password the server is looking for is one that was automatically created when Ubuntu was installed for you by your VPS host. You previously copied and saved it to your server text file. Copy it now. Remember it is just after ssh root@Your-IP.
Go back to the PowerShell and click the top border, then place your mouse pointer anywhere inside the PowerShell window and right click. It will seem like nothing happened, but immediately press Enter and you will see the greeting window. That is, you will see it if everything went well.
Do not get discouraged if this process fails. It takes some time to get used to the steps you must take to use the PowerShell, but once you learn them, you'll be flying through it like nobody's business!
Troubleshooting PowerShell
If you get hung up, close PowerShell and start over by reopening it. You can close it in two ways. The first is by simply typing exit and pressing Enter on your keyboard. The other way is to just press the X in the top of the PowerShell window and it will close.
_______________________________________________
After You Log Into the Ubuntu Server
When you successfully log in, you will see a screen similar to this one:
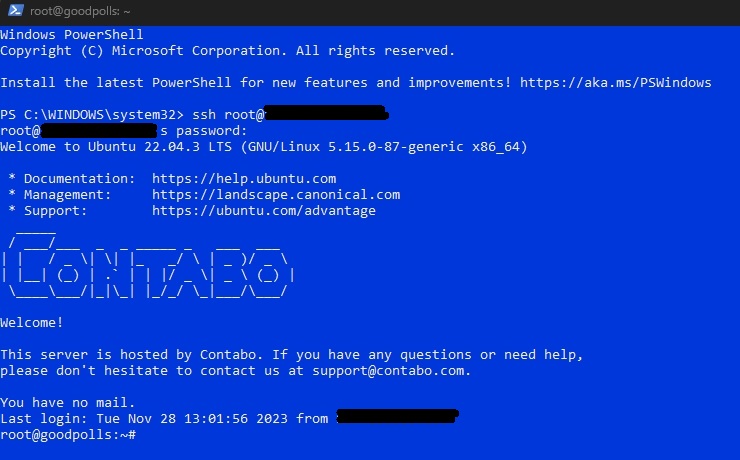
Note my real data is hidden. Yours will be there.
Click anywhere inside the PowerShell window. Press the Enter key on your keyboard. Press Enter again. The line should advance in the PowerShell. If this is what you see, we are ready to proceed with some configuration and security steps.
_______________________________________________
A D V E R T I S E M E N T
_______________________________________________
Add these lines to your server text file. Be sure to replace the IP and password where necessary.
######
ssh root@Your-IP
Your-Password
systemctl status sshd
######
ufw status
ufw allow from Your-IP to any port 22 proto tcp
-->  remove all other ssh access
ufw status numbered
-->  select the number to delete
ufw delete (the number)
-->  remove all but yours
-->  repeat until you are finished
ufw reload
ufw enable
ufw status
ip a -->  if IPv6 is there, remove it by:
nano /etc/sysctl.conf
--> to disable IPv6 on all interfaces system wide, add line to end of file:
net.ipv6.conf.all.disable_ipv6 = 1
nano /etc/default/ufw
--> IPV6=yes to IPV6=no
nano /etc/default/grub
-->  modify file:
GRUB_CMDLINE_LINUX_DEFAULT="quiet splash vultr"
#GRUB_CMDLINE_LINUX_DEFAULT="vultr "
GRUB_CMDLINE_LINUX="ipv6.disable=1"
--> save file
update-grub
systemctl status sshd
reboot
_______________________________________________
We need to discuss entering commands with PowerShell. They will appear here in the tutorial in boxes. Just highlight and copy them. You don't need to retype every one you are given. I mean, you can if you want to but that can create errors with typos.
Enter this:
systemctl status sshdYou may have to press the letter q to stop the listing. You should see this:

This shows everyone who is trying to log into your server. The only IP you want to see there is your own IP. You may see unfamiliar IPs. These are people all over the world trying to hack into your server. You should see Accepted password for root with your IP after it. This is good.
In my PowerShell window, the word active is green. This is good. Red is bad. If you don't get green, go back a few steps and re-check everything. It is normally a small mistake like an extra space that causes these things.
_______________________________________________
We want to keep hackers out of your shell access. So does the Ubuntu server. To do this, we will block everyone from the Universal Firewall (ufw) port 22 except you. We will go one step further and remove access to the shell from any IP other than your own. Enter:
ufw statusYou should see only ports 22 and 22 (v6) in the table.
To remove access to the shell from any IP other than your own home personal computer IP, you must first determine what your personal computer IP is. Open up your Nightly browser and type My IP in the search box. You should see your home personal computer IP. Be careful, some ads may try to get your attention. Look for your IP down the page. It should stand out.
Copy it and paste it into this command where MY-IP is. Enter the command:
ufw allow from MY-IP to any port 22 proto tcpOpen the ufw in numbered status:
ufw status numberedYou should see three numbered ports. We are going to close two of them. Select one that has Anywhere in the From column. Enter the following command to eliminate it. Replace the number with the bracketed number, like 3:
ufw delete numberEnter the ufw numbered status command again.
ufw status numberedSelect the remaining Anywhere port and delete it.
Look at the ufw status again.
ufw statusThe only port there should be 22/tcp from your personal computer IP. Make sure this is correct or you will be unable to use PowerShell to log into the server.
Reload the firewall, enable it and check status.
ufw reloadufw enableufw status_______________________________________________
A D V E R T I S E M E N T
_______________________________________________
Earlier I said we will only be using IPv4 in this tutorial. It's time to remove some other IPv6 hooks to tighten down the server some more.
_______________________________________________
Notice we are following the server text file you created earlier. The next steps will teach you how to edit a server file. It's fairly simple and we will be doing it quite a bit in this server tutorial.
If you make mistakes while editing a file, just use the exit command without saving. You will see how this works below.
Enter this:
nano /etc/sysctl.confYou will see the following screen. Nano is a text editor that can change any file on the server. Everything in a linux-based system is probably new to you, including the commands we must do to make things work. You will get used to them. Lines and code colored white are usually active command lines in the file.
Click in the PowerShell window. Use the down arrow key on your key board until the cursor is in the first blank space, five rows down.
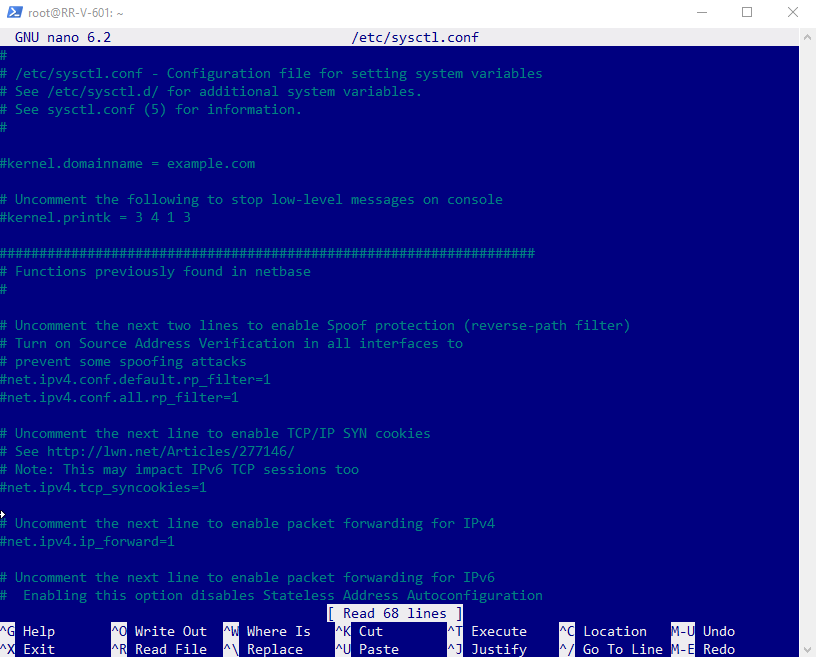
Paste this line into the file: (Remember, select the window, then right-click to paste.)
net.ipv6.conf.all.disable_ipv6 = 1It should look like this:
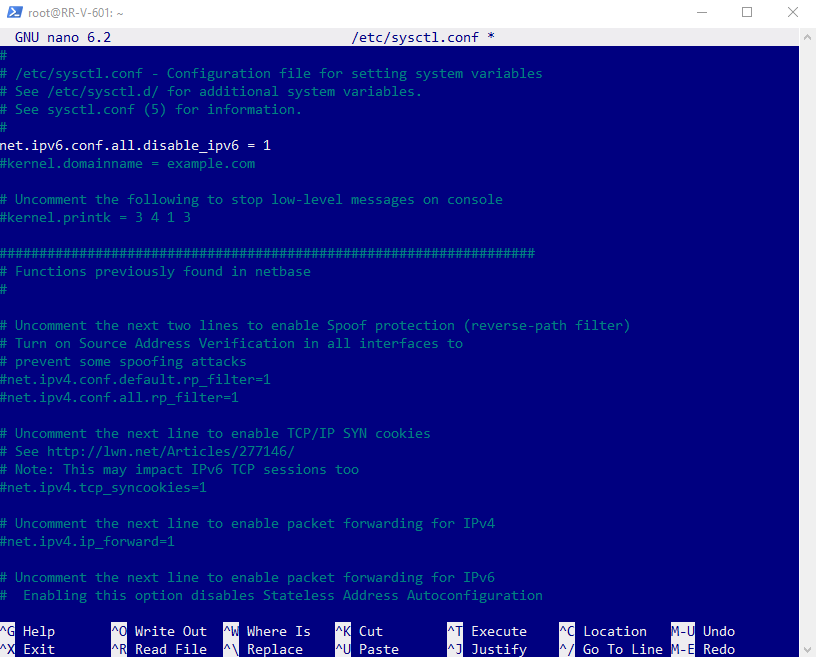
See the shortcut list on the bottom of the file in the PowerShell window? Click the top bar of the PowerShell Window and press Ctrl and the X keys. Press Y to save the file. Press Enter to write the file to the server. You will be back to the root awaiting the next command.
_______________________________________________
A D V E R T I S E M E N T
_______________________________________________
Enter this:
nano /etc/default/ufwChange IPV6=yes to:
IPV6=noSave the file.
grub (GRand Unified Bootloader) is a boot loader package. It helps the Ubuntu server on start up.
Enter:
nano /etc/default/grubMake these changes:
GRUB_CMDLINE_LINUX_DEFAULT="quiet splash vultr"

GRUB_CMDLINE_LINUX="ipv6.disable=1"
When you are finished, the file should have these active lines:
GRUB_DEFAULT=0
GRUB_TIMEOUT_STYLE=menu
GRUB_TIMEOUT=3
GRUB_DISTRIBUTOR=`lsb_release -i -s 2> /dev/null || echo Debian`
GRUB_CMDLINE_LINUX_DEFAULT="quiet splash vultr"
GRUB_CMDLINE_LINUX="ipv6.disable=1"
Save the file. Then enter:
update-grubEnter:
reboot_______________________________________________
This completes the Initial Server Configuration. Your Ubuntu server is operating safely and securely.
- Access is via the root with a very secure password. While it is possible a hacker could guess the password, the odds are that it would take them billions of years to brute-force the 32 mixed character password. I feel this is pretty safe. The only way a hacker could gain access at this point is through a compromise of the server VPS. All of these scenarios are highly improbable.
- The only access to your server is via ssh, or the shell terminal. You are using PowerShell to do this.
- Only IPV4 address lines can access your root login. IPV6 is disabled, which removes a route the hackers can use. And only your personal computer IP is allowed in via the shell access.
- The firewall is engaged. The only ports opened are those for ssh. This significantly reduces the attack exposure to your server.
_______________________________________________
We need to install a few more items on the Ubuntu server before we install Apache. We also need to learn a few more things to help us understand the Ubuntu server operation. Take a break and come back.
Final Ubuntu Server Configuration_______________________________________________
COMMENTS - Initial Ubuntu Server Configuration
_______________________________________________

_______________________________________________

_______________________________________________
If You Like This:
I may make affiliate fees from services you select on this website.
Thank you!
©1998-2023 RocketRanch