Apache Tutorial
Set up a Ubuntu/Apache cloud-based server
Install MySQL
_______________________________________________
Introductory Comments
MySQL, the most popular Open Source SQL database management system, is developed, distributed, and supported by Oracle Corporation. MySQL is normally pronounced My S Q L but others say My Sequel. MySQL databases are relational. This means the database stores data in separate tables rather than putting all the data in one big file. The SQL part of "MySQL" stands for "Structured Query Language". SQL is the most common standardized language in use to access databases. You can learn more about MySQL here.
_______________________________________________
Preparations
Make sure:
- The PowerShell window is open.
- The server text file you made is open.
- The Nightly browser is minimized.
_______________________________________________
Update your working server text file
Add these lines to your server text file. Be sure to replace the IP and password where necessary.
######
ssh root@Your-IP
Your-Password
systemctl status sshd
###
###
###  MYSQL
###
###
apt install mysql-server php-mysql
systemctl restart apache2
systemctl restart mysql
systemctl status apache2
systemctl status mysql
-->  create mysql-root-password:  --> you know the rules!
<put your mysql-root-password here without brackets or quotes or anything>
mysql
SELECT user,authentication_string,plugin,host FROM mysql.user;
ALTER USER 'root'@'localhost' IDENTIFIED WITH caching_sha2_password BY 'password';
exit
mysql_secure_installation
mysql-root-password
-->  accept defaults
mysql -u root -p
-->  to see user table:
mysql
SELECT user,authentication_string,plugin,host FROM mysql.user;
exit
###   '> '\c closes query
###   \q  closes query, exits mysql
-->  create mysql user
DROP USER 'user'@'localhost';  -->  verifies user doesn't exist
CREATE USER 'user'@'localhost' IDENTIFIED BY 'user password';
GRANT ALL PRIVILEGES ON *.* TO 'user'@'localhost' WITH GRANT OPTION;
FLUSH PRIVILEGES;
exit
systemctl restart mysql
systemctl status mysql
-->  to login:  mysql -u user -p
-->  to test: systemctl status mysql.service
-->  to see database enter:  mysqldump my_database
-->  update user password:
-->  ALTER USER 'user'@'localhost' IDENTIFIED BY 'user password';
-->  https://www.mysqltutorial.org/mysql-show-users/
-->  mysql -u user -p
-->  mysql> use mysql
-->  SELECT user FROM user;
_______________________________________________
Update your Ubuntu server files
Make sure you are logged into your Ubuntu server with PowerShell. You may see some upgrade info. If so we will get to it through this path:
apt updateRecently, apt update has been deprecated. This means it will work right now but will not some time in the future. I will tell you how to bypass this warning later on in the Domain Optimization section of the tutorial.
apt list --upgradableapt upgradeAs the upgrade progresses, sometimes it may stop and ask you a question. 99% of the time it will be OK to say OK. If it suggests a reboot, do it. Then start over at the apt update. The notice may look like this:
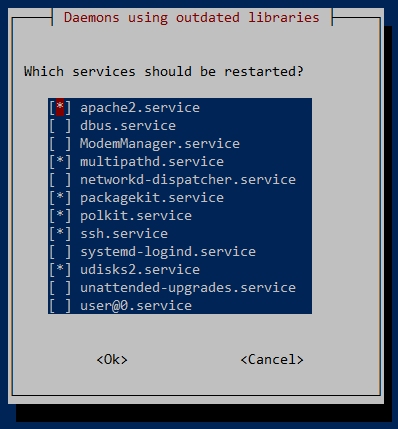
To make it start running again, use the Tab key to highlight the <Ok> key. Then press Enter. You can also use the Space Bar to change states of choice, for example, to select or deselect an option. The Tab key allows you to move around to highlight different areas in the response area. Answer the request and move to the next command.
apt dist-upgradeapt autoremove_______________________________________________
Install MySQL
Install the MySQL module. It may ask you to restart some services. You can but there are usually one or more reboots during the installation. You can do it for practice.
apt install mysql-server php-mysqlsystemctl restart apache2systemctl restart mysqlRemember, q stops the listing on the following status commands:
systemctl status apache2systemctl status mysqlIt's time to add some more security to the MySQL root password. You should have your mysql-root-password ready. Enter mysql:
mysqlAt the mysql> prompt, enter:
SELECT user,authentication_string,plugin,host FROM mysql.user;You will probably see a lot of lines, some misaligned. Look at the one for root. In the plugin column, it will have auth_socket. We will change this and give the root user a password to use when entering the MySQL server. Be sure and replace mysql-root-password with the one you created. Enter:
ALTER USER 'root'@'localhost' IDENTIFIED WITH caching_sha2_password BY 'mysql-root-password';If the query was OK, enter this command again to examine the table:
SELECT user,authentication_string,plugin,host FROM mysql.user;The plugin column for root will have changed to caching_sha2_password. Time to do another security upgrade. Type exit at the mysql> prompt.
exit_______________________________________________
A D V E R T I S E M E N T
_______________________________________________
We now need to improve the overall security of your production MySQL installation. Enter:
mysql_secure_installationEnter your mysql-root-password.
VALIDATE PASSWORD COMPONENT - I say No because I am the only one on this MySQL server. if you are going to allow others to log in, you should press Y. Otherwise, press any key to proceed.
Change the password for root here? - NO.
Remove anonymous users? Press Y.
Disallow root login remotely? Press Y.
Remove test database and access to it? Press Y.
Reload privilege tables now? Press Y.
All done!
_______________________________________________
Work on the MySQL service
Time to do some user work on the MySQL server. Log into the MySQL service as root.
mysql -u root -pTo exit a query, enter '> '\c
To exit a query and quit mysql, enter \q
To exit mysql from the mysql> prompt, type exit.
Normally, you don't want the root user to access the database. You want other users created with privileges as needed to do the job. You will learn more about using databases later. For now, let's create a database user.
Make sure you are at the mysql> prompt. First, we need to make sure the user doesn't exist. I know this is a brand new database with no users. But this teaches you a process to follow in the future, when you need to add users with database access. Make up a username, like dilbert.
DROP USER 'dilbert'@'localhost';You can see the error that happens. The user doesn't exist. Let's create a new user, dilbert. The user will need a different password to access the MySQL server.
CREATE USER 'dilbert'@'localhost' IDENTIFIED BY 'a-32-character-password';The mysql service responds with a Query OK. Now, let's give the user some rights, or privileges on the MySQL server.
GRANT ALL PRIVILEGES ON *.* TO 'dilbert'@'localhost' WITH GRANT OPTION;You may have noticed that commands in caps are no different than those in lower case. Next, do a MySQL server cleanup:
FLUSH PRIVILEGES;Let's make sure the user is using caching_sha2_password. Enter:
SELECT user,authentication_string,plugin,host FROM mysql.user;Exit and restart the mysql service.
exitsystemctl restart mysqlsystemctl status mysql_______________________________________________
A D V E R T I S E M E N T
_______________________________________________
One more thing before we press on, let's see which users have access to MySQL. Log back into the mysql service. You can use root or the user you created. Substitute it for user. Enter the following command:
mysql -u user -pYou should be at the mysql> prompt. Enter:
use mysqlSELECT user FROM user;You will see a table with users. You may be surprised there are several users. You should see the user you created, root, and several system maintenance and control users.Type exit and reboot the server. When you are ready, it's time to install phpMyAdmin, the control GUI for MySQL.
Install phpMyAdmin_______________________________________________
COMMENTS - Install MySQL
_______________________________________________

_______________________________________________

_______________________________________________
If You Like This:
I may make affiliate fees from services you select on this website.
Thank you!
©1998-2023 RocketRanch