Apache Tutorial
Set up a Ubuntu/Apache cloud-based server
Install PHP
_______________________________________________
Preparations
Make sure:
- The PowerShell window is open.
- The server text file you made is open.
- The Nightly browser is minimized.
- FileZilla is opened.
_______________________________________________
Update your working server text file
Add these lines to your server text file. Be sure to replace the IP and password where necessary.
######
ssh root@Your-IP
Your-Password
systemctl status sshd
######
###
###   INSTALL PHP
###
apt update
apt install php libapache2-mod-php
php -v    -->  8.1.2
apt install php-pear   --> may already be installed
systemctl restart apache2
apt-get install -y php8.1-cli php8.1-gd php8.1-intl php8.1-common php8.1-mysql php8.1-zip php8.1-gd php8.1-mbstring php8.1-curl php8.1-xml php8.1-xmlrpc php8.1-bcmath
phpenmod mysqli
phpenmod mbstring
nano /etc/php/8.1/cli/php.ini
upload_max_filesize = 20M
systemctl restart apache2
systemctl status apache2
-->  put index.php test file into /var/www/ and test from IP
reboot
_______________________________________________
Some preliminary Filezilla work
Before we jump into PHP installation, we are going to verify something in FileZilla. The program can transfer files in three ways. Auto, ASCII, and Binary. It's best to verify it set to Auto. I'll also show you the area where you can add other file types. The reason for this is some files MUST be transferred in ASCII. If you add the file extensions to FileZilla, it will remember to transfer those files in ASCII format. Do this:
Open FileZilla and select the Edit tab. Select Settings...
The following window opens. Select page: Transfers | FTP: File Types
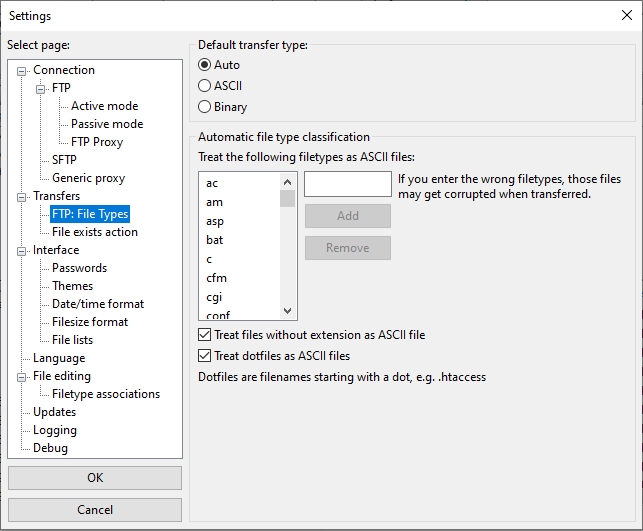
Make sure Treat files without extension as ASCII file and Treat dotfiles as ASCII files are checked.
See the column above those lines? This contains the file extensions that FileZilla automatically treats as ASCII transfers, even with Auto selected. You can add or remove an extension in the empty box next to that column. That's all we need to discuss about FileZilla for now.
_______________________________________________
Update your Ubuntu server files
Make sure you are logged into your Ubuntu server with PowerShell. You may see some upgrade info. If so we will get to it through this path:
apt updateRecently, apt update has been deprecated. This means it will work right now but will not some time in the future. I will tell you how to bypass this warning later on in the Domain Optimization section of the tutorial.
apt list --upgradableapt upgradeAs the upgrade progresses, sometimes it may stop and ask you a question. 99% of the time it will be OK to say OK. It may look like this:
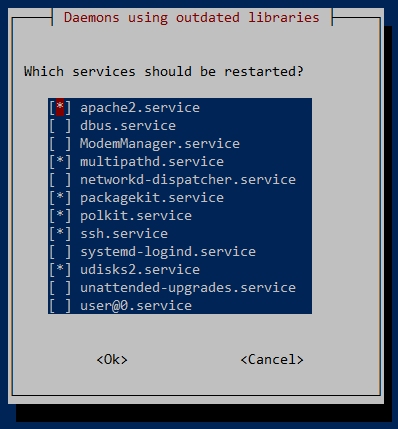
To make it start running again, use the Tab key to highlight the <Ok> key. Then press Enter. You can also use the Space Bar to change states of choice, for example, to select or deselect an option. The Tab key allows you to move around to highlight different areas in the response area. Answer the request and move to the next command.
apt dist-upgradeapt autoremove_______________________________________________
A D V E R T I S E M E N T
_______________________________________________
Install PHP
PHP (recursive acronym for PHP: Hypertext Preprocessor) is a widely-used open source general-purpose scripting language especially suited for web development. It can be embedded into HTML. What distinguishes PHP from something like client-side JavaScript is that the code is executed on the server, generating HTML which is then sent to the client. By the way, the 'client' is the web browser receiving the webpage from the server. The client would receive the results of running that script, but would not know what the underlying code was. You can even configure your web server to process all your HTML files with PHP, and then there's really no way that users can tell what you totally have up your sleeve.
The best part about using PHP is that it is extremely simple for a newcomer, but offers many advanced features for a professional programmer. Don't be afraid to read the long list of PHP's features: PHP Features. You can jump in, in a short time, and start writing simple scripts in a few hours.
Install the PHP module. It may ask you to restart some services. You can skip this because there are usually one or more reboots during the installation. But you can go ahead and do the restart for practice if you wish.
apt install php libapache2-mod-phpNote the PHP version and update your server text file if the version is different.
php -vPEAR is short for "PHP Extension and Application Repository," a hodge-podge of PHP related support items.
apt install php-pearsystemctl restart apache2systemctl status apache2Remember checking the version of PHP? It's important because we will install some common PHP support files. They must be the same version. In this case, 8.1. The get install -y tells Ubuntu to install all the files listed without prompting you for input. This makes it much faster. Enter the following command:
apt-get install -y php8.1-cli php8.1-gd php8.1-intl php8.1-common php8.1-mysql php8.1-zip php8.1-gd php8.1-mbstring php8.1-curl php8.1-xml php8.1-xmlrpc php8.1-bcmathPHP needs to be able to interact with the newest MySQL files. Enter this command:
phpenmod mysqliMbstring is an extension of PHP used to manage non-ASCII strings. Enter the following command:
phpenmod mbstringTo upload files with PHP on your web server, you must adjust PHP to handle them. Edit the following file and change the maximum file size. Find upload_max_filesize and change the value to 20. You can use the search engine within the nano editor by pressing Ctrl W.
nano /etc/php/8.1/cli/php.iniSave the file. Ctrl X, Y, Enter. Then restart Apache.
systemctl restart apache2systemctl status apache2_______________________________________________
A D V E R T I S E M E N T
_______________________________________________
PHP test file
That's it for the PHP installation. We need to test it. Construct a simple PHP file. Do this by creating a new text file on your desktop. Name it test.txt. Paste the following code into the file:
<?php echo "<!DOCTYPE html>
<html>
<head>
<style>
div {
  border: 4px solid gray;
  padding: 8px;
  height: 200px;
  width: 50%;
  text-align: center;
  margin: auto;
  width: 50%;
  background-color: #0000FF;
}

h1 {
  text-align: center;
  text-transform: uppercase;
  color: #fed700;
}

p {
  text-align: center;
  letter-spacing: 3px;
  color: #fed700;
}

</style>
</head>
<body>

<div>
  <h1>PHP test successful</h1><br>
  <p>You have successfully installed the PHP module!</p>
  <p> Great work!</p>
 </div>

</body>
</html>"; ?>
Rename the file test.php. Open up FileZilla and connect to your Ubuntu server. In the left window, click on Desktop and look for test.php. Look in the right window and navigate your way to the www directory.
Drag test.php over to the www directory. Now, open up Nightly and go to Your-URL/test.php.
Tada!
There is another thing to learn. Any file named index.php placed in a root www directory is automatically displayed without typing the filename. Go back to FileZilla and change test.php to index.php.
Go back to Nightly and change the URL by removing test.php from the line and press Enter. Viola! Again!
Now it's time to set up Your-Domain on the Apache2 web server. Reboot the Ubuntu server and press on when you are ready.
Set up Your Domain_______________________________________________
COMMENTS - Install PHP
_______________________________________________

_______________________________________________

_______________________________________________
If You Like This:
I may make affiliate fees from services you select on this website.
Thank you!
©1998-2023 RocketRanch